Hand-made Igbo blouses have become a trendy staple for every woman of Igbo culture. They will help you to demonstrate both your exquisite taste and creativeness.
Sh-h-h… Now we will tell you the easiest way of how to cut and sew Igbo blouse – the sleeveless one with the basque! Don’t forget to tell your friends about it!
Install free updated Jiji app now – and in only a couple of hours, you’ll understand why this app is number one among the most downloaded apps for online shopping!
1. The measurements you’ll have to take:
- Shoulder length;
- Bust across the nipples;
- Under the breasts;
- Over the breasts;
- The distance between the nipples;
- The distance from the shoulder to the nipple;
- The distance from the back’s top point to the lowest point;
- Ready-made item length;
- Basque length;
- Waist.
Basques come in a multitude of varieties but the simplest to sew at home is the full circle variant.
Check out this detailed tutorial about how to cut and put together an Igbo blouse with full circle basque. Make sure you have at least 1.8 meters of desired fabric, with about a meter of it to be spent on the basque.
Read also:How to cut and sew trousers
2. How to cut and sew Nigerian blouses: how to make the basque
- First, we have to fold the fabric four times with the center in the upper left corner.
- Then we mark the line where we will make the lower cut.
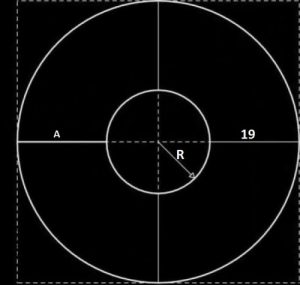
- We measure the radius, draw a circle and measure the necessary basque length.
- Next, we cut out the basque with some extra fabric for seams. We cut along the line А of the very transfer center.
- Press it from the inside with an iron.
- Create an ornamental wide zigzag stitch and stretch the fabric slightly.
- Carefully remove all the unnecessary fabric.
- Process the front side similarly.
3. How to cut a blouse top
Create your layout on a sheet of paper with all the inscriptions and pin the details you have cut from the paper pattern to your fabric.
- Fold the front once and the back twice;
- Next, we fill the neck with a single fold and fold once the behind of the neck;
- Pin the paper patterns to the fabric.
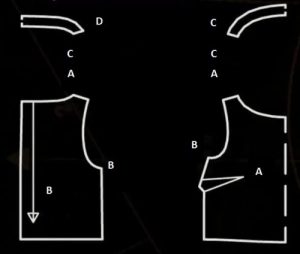
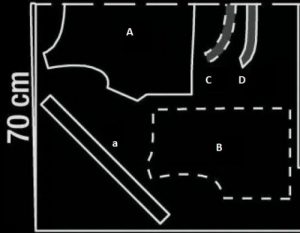
Fold the fabric in half and place along the front side inward. Next, we place the paper pattern А, B, C, and D on the fabric with parts A, C and D to the fold and parts B and C (marked with dotted lines) have to be put on the fabric with the inscriptions down. Fix with pins.
Use the tailor’s chalk to add extra 1.5 cm for seams and cuts. Cut all the details.
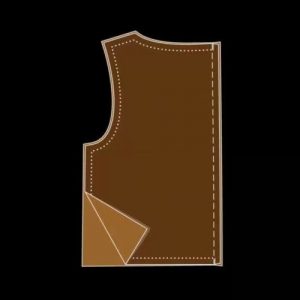
4. Behind
- Fold rear parts in the front sides and pin the parts in the center.
- Trim the details by skiving.
- Join the over-measures and iron in one direction.
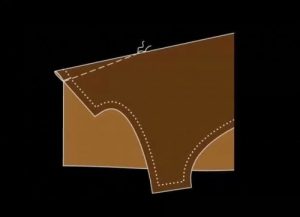
5. Panel front
- The front parts must be folded along the middle face-to-face.
- Fix the tuck lines with a pin, stitch from the side cut to the tuck center.
- Clip the beginning of the line.
- Press the tuck carefully.
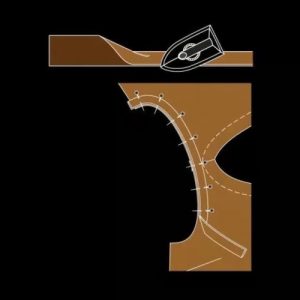
6. Shoulders seams and gorge
- Join the panels front-to-front pinning the shoulder parts.
- Trim the details.
- Press the over measures of the seams with an iron.
- Join the gorges pinning shoulder parts.
- Trim the details.
- Disclose the extra fabric on the seams.
- Process the inner edge.
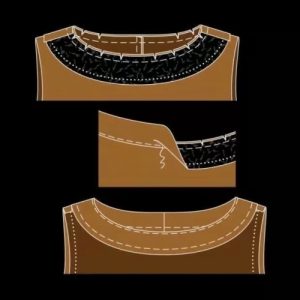
7. Neck hole
- Perforate the neck opening on the top panel to the front side joining the shoulder seams.
- Fix the pieces of the neck opening and trim the details by skiving.
- Cut off extra fabric close to the stitch making clips in the neighboring areas.
- Sew the gorge close to the seam.
- Turn the gorge inside out and iron.
- Leave 3.5 cm from the front side of the neck.

8. Armholes
- Remove the over measures of armholes pieces leaving up to 1 cm.
- Fold each edge of the armhole along the inward side and press carefully.
- Double fold the welt and fix it to the armhole part with a pin trying to fit with the edge of the over-measure.
- Stitch from the inside of the blouse along the line of armholes.
- Remove the extra welt.
- Remove the extra fabric close to the seam making clips in the surrounding areas.
- Turn the welt inside out, iron the armhole and separate it by 7 mm, pinning the inner edge of the welt.
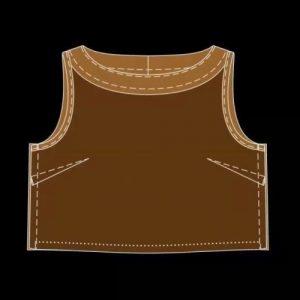
9. Side seams
- Join the front sides of behind and panel front and fix the edges with a pin.
- Trim the details.
- Iron the stitches.
- Take a needle and sew the upper edges of seam over measures to the edge of the armhole.
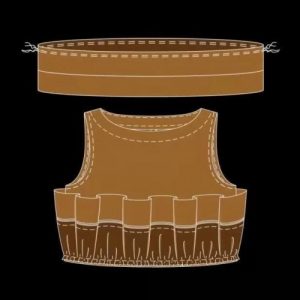
- Thread the basque to the top piece
- Fix the basque with a pin to the bottom of the top front-to-front.
- Trim the details.
- Join the seam over-measures.
10. How to cut off shoulder blouse video
How to sew an Off-Shoulder Lace Blouse with Linning
How to sew an off shoulderBlouse with lace linning
11. How to cut padded blouse: step by step video
How to make a padded blouse cutting and stitching at Home easy & quick
How to make a padded blouse cutting and stitching at Home easy & quick
Hopefully, this tutorial has given you lots of idea about how to create a fabulous garment to make you look absolutely stunning! And finally – don’t forget to measure twice before you cut once!
Install free updated Jiji app now – the most convenient app for online shopping made for modern people who appreciate comfort!


